How to Make a Circular Saw Guide for Straight Cuts
To make a circular saw guide, attach a straight fence to a flat base, then trim the base with your saw so its edge marks the blade’s cut line. Clamp it in place before each cut.
On this page (7 sections)
- What materials do you need to make a circular saw guide?
- How do you build a circular saw guide step by step?
- How do you set the fence for your saw?
- How do you clamp and use the guide safely?
- How long should a circular saw guide be?
- Can you use a circular saw guide on plywood?
- When does a homemade guide make sense?
To make a circular saw guide, fasten a straight fence to a flat base, then trim the base with your saw so its edge marks the blade’s cut line. Clamp it in place before each cut, and test the setup on scrap.
A simple guide can help you cut plywood and boards without a table saw. The key is setting the fence for your saw’s base plate, then using the trimmed edge as a direct reference for the cut.
What materials do you need to make a circular saw guide?
You need a flat base, a straight fence, fasteners, a measuring tool, and clamps. Choose material that stays flat and gives the saw base room to travel.
A sheet of plywood or MDF can work as the base, while a straight board can serve as the fence. Check the fence against a known straight edge before attaching it; a bowed fence will guide the saw along a curve.
Use screws or another suitable fastening method that won't protrude into the saw’s path. Keep the base wide enough to support the saw, but not so wide that it becomes hard to handle.
How do you build a circular saw guide step by step?
Attach the fence, make a test cut, and trim the base to the blade line. This makes the guide’s edge a visible reference for the cut with your saw.
- Check that the base is flat and the fence is straight.
- Position the fence so the saw base can ride against it.
- Fasten the fence firmly to the base, keeping fasteners clear of the blade path.
- Place the saw against the fence and cut along the base.
- Use the freshly trimmed base edge to line up future cuts.
- Make a test cut in scrap and check the result before cutting your workpiece.
Follow your saw’s manual for blade depth, support, and safe operation. Keep hands clear of the blade path, and unplug a corded saw or remove its battery before adjusting the guide or changing the blade.
How do you set the fence for your saw?
Set the fence so the saw’s base plate rides against it without binding. The exact spacing depends on your saw’s shape and the position of its blade.
Place the saw on the base with its edge against the fence. Check that the blade will cut the base cleanly without striking the fence or fasteners.
If the saw’s base has a raised edge, guard, or other feature that changes how it rests, account for that before fastening the fence. Use a test cut to confirm the saw travels freely.
How do you account for blade offset?
The blade offset is the distance between the guide edge and the cut line. Trimming the base with the saw creates a reference edge for that saw and setup, so keep the same saw with the guide when possible.
If you use the guide with another saw, make a new test cut and check where that saw’s blade lands. Don't assume both saws have the same offset.
How do you clamp and use the guide safely?
Clamp the guide so it cannot shift, and support the workpiece on both sides of the cut. Keep clamps out of the saw’s path and make sure the saw can travel the full length without hitting them.
Mark the intended cut, align the guide edge with that mark, then check the blade path before starting. Keep the offcut supported so it won't pinch the blade as the cut finishes.
Move the saw at a steady pace and keep its base in contact with the guide. For more setup and handling advice, read how to use a circular saw for beginners.
How long should a circular saw guide be?
Choose a guide that covers the full cut with room for the saw to start and finish. A short guide may suit boards, while a long guide is useful for large panels.
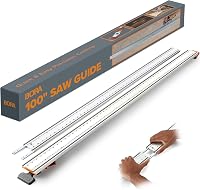
A long straight edge clamp can help when cutting sheet goods, but it needs enough room to sit flat and stay secured. The BORA NGX combines a 50-inch clamp edge with a 50-inch extension and includes connectors.
For a simpler guide, the ProGrip 50-inch straight edge clamp has an adjustable jaw for aligning and securing it to a panel.
The ProGrip set includes 24-inch, 36-inch, and 50-inch clamps, giving you several lengths to match different cuts.
Measure the cut and available clamping space before choosing a rail. If you want a purpose-made rail system, compare options in our guide to circular saw guide rails.
Can you use a circular saw guide on plywood?
Yes, a guide can help keep a circular saw straight across plywood. Support the full sheet well and keep the offcut from falling or pinching the blade.
A long guide is useful for cuts that run most of the length of a panel. For sheet setup, blade depth, and support ideas, see how to cut plywood with a circular saw.
If you’re ripping a narrower board, the guide still needs to sit securely without interfering with the saw or your hands. Our walkthrough on how to rip a board with a circular saw covers that cut.
When does a homemade guide make sense?
A homemade guide makes sense when you have a straight board, a flat base, and a saw you can keep paired with the setup. It's a practical option for occasional straight cuts and can be made to fit the saw you already own.
A purchased clamp edge can be more convenient if you make frequent cuts, need different lengths, or don't want to build a guide. A track saw uses a dedicated rail system; learn how it differs in what a track saw is.
Choose a homemade guide for occasional use and a clamp or rail when repeat setup or longer cuts matter more. Before cutting, confirm the guide is straight, secure, and positioned so the blade clears clamps and fasteners.
Frequently asked questions
How do you make a circular saw guide?
Fasten a straight, rigid fence to a flat base, with the fence set to suit your saw’s base plate. Run the saw along the fence to trim the base edge; that new edge shows where the blade will cut.
Clamp the guide securely and check the alignment before each cut.
What can I use as a straight edge for a circular saw?
A straight, rigid board or a purpose-made edge clamp can guide a circular saw. Check that the edge is straight, the saw base can travel along it without hitting clamps, and the guide can be secured without shifting.
A long rail helps with sheet goods.
How do I account for the saw blade offset?
The saw’s blade offset is the distance from the guide edge to the blade’s cut line. Make a test cut with the saw against the fence, then use the trimmed base edge or measure the distance from the fence to the blade.
Keep the same saw and setup for repeat cuts.
Is a homemade circular saw guide accurate?
A homemade guide can help make straight cuts if its fence is straight, the base is flat, and the guide stays clamped during the cut. Check the fit with your saw and make a test cut on scrap first.
Accuracy also depends on steady saw movement and a suitable blade.