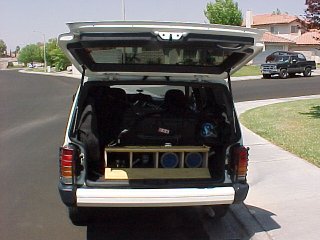
My friend Doug is an avid SCUBA diver. He asked me if I could make a
rack to hold his SCUBA tanks in the rear of his SUV. Previously, he just put his tanks
in the back of the truck and then piled the rest of his gear on top of them. He wanted
something that would allow him to easily remove the tanks and still store lots of other gear
on top of them as well.
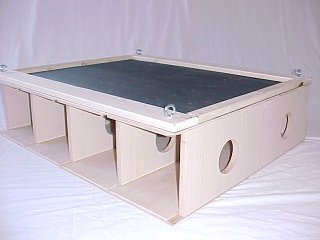
The design I came up with was fairly simple. It’s just a box with
four internal compartments for the SCUBA tanks and a large area on top for other gear.
The overall box measures 38 ˝” wide by 33” long by 9 ľ” high. The openings for
the tanks measure 8 ˝” x 8 ˝”, which provides enough room to easily insert the 7 ˝”
diameter tanks but not so much room that they roll around haphazardly.
The top and bottom of the case are made of ˝” birch plywood. The
vertical supports are oak-laminated particle board. The strips around the edge of the
top cargo area are poplar.
The five vertical support sections are set into dadoes and rabbets in both
the top and bottom of the case. The are all secured with both glue and 1” wood screws.
Each of the vertical sections also contains two holes through the side. The holes
are 4” in diameter and serve several purposes. First, the holes make the case a
little lighter and therefore easier to lift and load into the truck. Second, the
holes allow for air circulation. This will be important since the tanks may often
still be a little wet when they are placed back into the rack. Third, the holes are
large enough for a person to put his hand through so that he can clean the inside
of the tank compartments (of sand, seaweed, etc.) if necessary. Fourth, the holes
provide places for ropes or bungee cords to be attached so that the rack can be
tied down or so that other items can be tied to the rack itself.
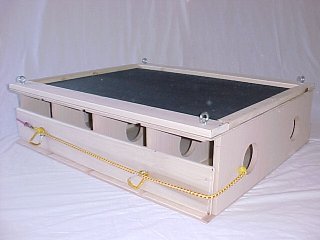
The top of the case is fitted with black rubber matting. This will
provide a non-slick surface on which to store other items and will also help waterproof
the top of the cabinet. The rest of the cabinet has been treated with a water-sealer
to guard against moisture. Additionally, I ran a bead of silicone down each joint to
provide moisture protection. The rubber mat was attached with industrial staples.
The edges of the mat were then covered with strips of ľ” poplar which also provide a
border to help control smaller items stored on top of the case. At each corner of
the top of the case, I attached a 5/16” eye bolt through the top. These can be used
as tie-downs to help secure any gear stored on top of the case.
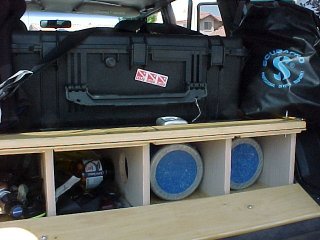
The tanks are prevented from sliding out the back of the case by a 3” tall
strip of the laminated particle board that is permanently attached with glue and screws.
The tanks are prevented from sliding out the front of the cabinet by a removable
piece of poplar measuring 5” x 38 ˝” x ľ”. The board is held in place against the
cabinet using bungee cords. The cords run through some quick-release hooks that
attach to the board via 3/8” eye bolts. The front of the cabinet is also at the
rear of the truck and, therefore, the SCUBA tanks will also be prevented from sliding
out of the cabinet whenever the tailgate of the truck is closed.
I didn’t need to make any real jigs to aid in the creation of this project,
but I did need to create one circle pattern to use
with my router. I needed a way to cut a series (ten, to be exact) of 4” diameter
circles in the vertical supports. I ended up making a circle pattern in a piece of ˝”
thick poplar. I used my plunge router with a ľ” straight bit with a bearing to cut the
circles. Once I got a rhythm going, I was able to make all of the circle cuts easily and
fairly quickly. More importantly, all the circles are identical.
This was an interesting project because its intended purpose was so different
from most of my other work. I hope it provides my friend years of service and
accompanies him on many SCUBA diving trips.